Holo House
Holo House is an optional gameplay mode in HoloCure where players can play various minigames to gain rewards that can be used for the main game.
General
To unlock the Holo House, the player must first clear Stage 1 - Grassy Plains.
The Holo House can be accessed by choosing "Holo House" from the main menu. (Before unlocking, it simply displays as "????" below the Play button.) The player will be taken to the character selection screen to select their character, and must then select the Holo House "stage" to enter.
When in the Holo House mode, the player can run faster by holding the Confirm/Strafe button (Q by default).
The Holo House has both a day/night cycle, as well as a weather cycle (rainy/clear).
Characters

While in the Holo House, characters that players have already unlocked will occasionally join and wander throughout the map. Players can "talk" with these characters by pressing the Confirm/Strafe button, which will cause certain emotes to display above the character, depending on the number of times the player interacts with the character. Pressing talk enough times will cause the character to be annoyed (and earn the player the "Hey Hey" Achievement).
Characters may perform miscellaneous tasks such as catching fish for the player to collect, and watering growing crops in the farm. Note that any fish caught by other characters that are not picked up will be lost if the player leaves the Holo House.
The maximum number of characters in the map at once is limited; characters will periodically leave the Holo House to be replaced by another character.
When the weather turns rainy, all characters on the screen will hold blue umbrellas.
Holo House


![]() The actual Holo House is a building to the north of the map. The inside of the building can be decorated with various furniture and items that players can collect in the game. Most of these furnishings can be bought with HoloCoins from the Shiranui Constructions Shop handled by the
The actual Holo House is a building to the north of the map. The inside of the building can be decorated with various furniture and items that players can collect in the game. Most of these furnishings can be bought with HoloCoins from the Shiranui Constructions Shop handled by the ![]() Elfriend Foreman by the front of the house. A piece of furniture only needs to be bought once, and can then be placed an unlimited number of times. Some special furniture can be earned through the Fishing minigame.
Elfriend Foreman by the front of the house. A piece of furniture only needs to be bought once, and can then be placed an unlimited number of times. Some special furniture can be earned through the Fishing minigame.
The player can activate Build Mode by entering the Holo House building and pressing the pause button, then selecting Build Mode. Here, the player can select from the furniture they've earned or purchased, and place them onto valid tiles in the House; furniture items can be rotated, and multiple of the same furniture can be placed. When wall or floor styles are applied, the entire wall or floor is affected at once. The player can reset the House by pressing Reset in the Construction Shop outside.
List of Furnishings
| Item | |
|---|---|
| 0 | |
| 1000 | |
| 1000 | |
| 1000 | |
| 50000 | |
| 100000 | |
| 0 | |
| 3000 | |
| 5000 | |
| 3000 | |
| 5000 | |
| 20000 | |
| 40000 | |
| 25000 | |
| 20000 | |
| 75000 | |
| 75000 | |
| 75000 | |
| 75000 | |
| 75000 | |
| 75000 | |
| 75000 | |
| 20000 | |
| 15000 | |
| 100000 |
| Item | |
|---|---|
| 0 | |
| 300000 | |
| 15000 | |
| 60000 | |
| 100000 | |
| 150000 | |
| 50000 | |
| 20000 | |
| 2000 | |
| 30000 | |
| 20000 | |
| 100000 | |
| 150000 | |
| 150000 | |
| 3000 | |
| 30000 | |
| 100000 |
| Item | |
|---|---|
| 0 | |
| 50000 | |
| 0 | |
| 25000 | |
| 1000 | |
| 5000 | |
| 15000 | |
| 30000 | |
| 50000 | |
| 5000 | |
| 5000 |
| Item | |
|---|---|
| 10000 | |
| 20000 | |
| 15000 | |
| 10000 | |
| 50000 | |
| 20000 |
| Item | |
|---|---|
| 5000 | |
| 5000 | |
| 5000 | |
| 5000 | |
| 20000 | |
| 2000 | |
| 20000 | |
| 20000 | |
| 150000 | |
| 20000 | |
| 20000 | |
| 50000 | |
| 200000 | |
| 250000 | |
| 200000 | |
| 300000 | |
| 250000 | |
| 200000 | |
| 300000 | |
| 300000 | |
| 100000 | |
(Note: Only appears after getting all achievements) |
1 |
| Item | |
|---|---|
| 10000 | |
| 30000 | |
| 100000 | |
| 2000 | |
| 3000 | |
| 5000 | |
| 50000 | |
| 5000 |
| Item | |
|---|---|
| 3000 | |
| 200000 | |
| 2000 | |
| 30000 | |
| 50000 | |
| 75000 | |
| 20000 | |
| 10000 | |
| 50000 | |
| 30000 | |
| 200000 | |
| 5000 | |
(Note: Golden trophies only appear after you get golden fishes.) |
0 |
| 0 | |
| 0 | |
| 0 | |
| 0 | |
| 0 | |
| 0 | |
| 0 | |
| 0 | |
| 0 | |
| 0 | |
| 0 | |
(Note: Must have beaten any stage with hardcore upgrade) |
0 |
| Item | |
|---|---|
| 0 (Default) | |
| 10000 | |
| 100000 | |
| 25000 | |
| 25000 | |
| 25000 | |
| 50000 | |
| 50000 | |
| 25000 | |
| 100000 | |
| 0 (Default) | |
| 10000 | |
| 10000 | |
| 50000 | |
| 75000 | |
| 75000 | |
| 75000 | |
| 100000 | |
| 100000 | |
| 100000 | |
| 100000 |
Activities
Management Board

![]() The bottom right of the map contains an empty fenced area with a
The bottom right of the map contains an empty fenced area with a ![]() Management Board, where players can recruit Fans as Workers to work for them. Each worker has their own name, which is randomly generated from a pool of names provided by players.[1] Each worker recruited will passively earn HoloCoins, which can be collected by the player at any time. Each worker must be fed with a specific fish or crop; the exact type will be random. Unfed workers will lose their stamina until they fall into an Exhausted state, where they will no longer earn coins. Feeding Exhausted workers will restore their stamina, as well as grant them EXP to level up, which will make them better at earning HoloCoins. A worker's preferred food item will change upon leveling up. Any excess EXP over the current EXP limit will be carried over to the next level, and depending on how much food was fed, a worker can possibly level up multiple times in a single feeding.
Management Board, where players can recruit Fans as Workers to work for them. Each worker has their own name, which is randomly generated from a pool of names provided by players.[1] Each worker recruited will passively earn HoloCoins, which can be collected by the player at any time. Each worker must be fed with a specific fish or crop; the exact type will be random. Unfed workers will lose their stamina until they fall into an Exhausted state, where they will no longer earn coins. Feeding Exhausted workers will restore their stamina, as well as grant them EXP to level up, which will make them better at earning HoloCoins. A worker's preferred food item will change upon leveling up. Any excess EXP over the current EXP limit will be carried over to the next level, and depending on how much food was fed, a worker can possibly level up multiple times in a single feeding.
The players themselves have a Manager Level, with EXP gained each time a worker levels up. The player's Management Level increases based on the type and amount of food workers eat; rarer food items will provide more relative EXP to both worker and manager. Increasing Manager Level allows players to recruit higher-tier workers with higher stats. The tier of a worker is indicated by the presence and color of the star next to their name, as well as the color of their name. The level cap for Management is 4, granting access to the highest-tier workers, which have a Level Cap of 38 to 50, and are denoted by their red names and platinum stars.
The Management Board has the following options:
- Manage - The Manage tab is where players can perform administrative options on their workers, including checking on their individuals status. Players can use this tab to feed Exhausted workers to return them to working status. This tab is also where players can rename their workers, and also fire workers, which will permanently remove them from play.
- Hire - This tab allows players to recruit workers. Players must first send out a recruiting notice, which will generate a list of up to 5 random workers to choose from, but players can only choose one of the workers from the list to recruit. The first hire on this list will always be a fan of the character the player is currently using (for example, a Shrimp if the player is using Gawr Gura). Posting a recruiting notice has a starting cost of 500 HoloCoins, which increases by another 500 for each additional worker already active, up to a maximum of 5,000. Up to 10 workers can be recruited, and if players want to recruit a new worker beyond the limit, they must first fire an existing one. Each worker has 4 randomly generated main stats to consider:
- Efficiency - This stat determines how fast the worker can collect HoloCoins. (1 efficiency = 1 coin gained every 2 to 10 seconds)
- Stamina - The larger this stat, the longer a worker can keep working before becoming Exhausted. (1 stamina = 20 seconds of work)
- Max Level - The maximum level to which the worker can be raised. Each level-up gives +1 Efficiency and +2 Stamina.
- EXP Rate - How fast the worker levels up.
- Collect - Players can use this tab to view the HoloCoins earned by each worker (and can be used to gauge a worker's efficiency), and here the player can collect the earned HoloCoins, which will be immediately added to the player's account.
- Read - The main help guide for the Management Board.
Management Tips
- It can be worth it to replace workers with better ranking ones on reaching a higher manager rank, as higher ranking workers have better stats to allow them to work longer and more efficiently for the same amount of resources fed to them.
- If a worker is on a favorable preferred food, you may want to stop just before the next level, then feed them the maximum number of foods when they become exhausted. Likewise, if the worker is on an unfavorable preferred food, you should feed them just enough to reach the next level, where they will hopefully draw a more favorable preferred food.
Farming

![]() A open-fenced garden can be found to the bottom right of the Holo House, where various types of crops can be grown and harvested. Once the plants start sparkling, the plants can be harvested to put them in the player's inventory. The produce can be used for various purposes within the Holo House, including feeding Fans and cooking meals. The garden crops can also be sold for HoloCoins.
A open-fenced garden can be found to the bottom right of the Holo House, where various types of crops can be grown and harvested. Once the plants start sparkling, the plants can be harvested to put them in the player's inventory. The produce can be used for various purposes within the Holo House, including feeding Fans and cooking meals. The garden crops can also be sold for HoloCoins.
The garden has eight plots, 4 above and 4 below. Players must purchase both soil and seeds from the vendor ![]() Nemu, residing to the right of the garden. The soil and seeds can then be placed on the plots, and players will need to wait for the plants to grow.
Nemu, residing to the right of the garden. The soil and seeds can then be placed on the plots, and players will need to wait for the plants to grow.
Each crop type has a different base grow time, which is the time it takes from planting to harvesting. The grow time, and the yield of the crop, also depends on the soil used.
 Standard Soil will have a normal growing time and normal crop yield (1-3 items)[Needs verification]
 Enhanced Soil will have a normal growing time, but triple the yield (2-9 items)
 Expedited Soil will have a normal yield, but the starting grow time will be reduced by 40%.
Players can speed up the growth process by watering the plants, which reduces the grow time of the selected plot by 60 seconds. Rainy weather will automatically water plants, and NPC Holo members may also randomly water plants as they pass by. Any watering action (manual and automatic) has a 60 second cooldown per plot.
List of Farm Items
| Item | |
|---|---|
| 200 | |
| 750 | |
| 1500 | |
| 100 | |
| 150 | |
| 200 | |
| 250 | |
| 300 | |
| 350 | |
| 400 | |
| 450 | |
| 500 | |
| 550 | |
| 600 | |
| 650 |
| Item | Base Grow Time | Watered Grow Time | Expedited Soil Grow Time | Expedited Soil + Watered Grow Time | |
|---|---|---|---|---|---|
| 50 | 05:00 | 02:00 | 03:00 | 01:00 | |
| 100 | 06:00 | 03:00 | 03:36 | 01:36 | |
| 150 | 06:30 | 03:00 | 03:54 | 01:54 | |
| 200 | 07:00 | 03:00 | 04:12 | 02:00 | |
| 250 | 07:30 | 03:30 | 04:30 | 02:00 | |
| 300 | 08:00 | 04:00 | 04:48 | 02:00 | |
| 350 | 08:30 | 04:00 | 05:06 | 02:06 | |
| 400 | 09:00 | 04:00 | 05:24 | 02:24 | |
| 450 | 09:30 | 04:30 | 05:42 | 02:42 | |
| 500 | 10:00 | 05:00 | 06:00 | 03:00 | |
| 550 | 11:00 | 05:00 | 06:36 | 03:00 | |
| 600 | 12:00 | 06:00 | 07:12 | 03:12 |
Fishing

![]() Players can find a small lake to the left of the map, and interacting with it will make the character throw a fishing line to the water. When a fish has been hooked, a short rhythm game will start, where the goal is to press the correct key input at the correct timing. Successfully completing the minigame will add the caught fish to the player's inventory, which can then be used for feeding workers and cooking, or can be sold to buy better fishing rods.
Players can find a small lake to the left of the map, and interacting with it will make the character throw a fishing line to the water. When a fish has been hooked, a short rhythm game will start, where the goal is to press the correct key input at the correct timing. Successfully completing the minigame will add the caught fish to the player's inventory, which can then be used for feeding workers and cooking, or can be sold to buy better fishing rods.
Initially, players are equipped with a basic fishing rod. More advanced fishing rods can be bought from ![]() Bloop, who runs a stand to the north of the lake. Fish can be sold to Bloop for
Bloop, who runs a stand to the north of the lake. Fish can be sold to Bloop for ![]() Sand, which is the currency used to buy fishing rods. More advanced rods are able to catch more varieties of fish, and have a higher chance of catching valuable "Shiny" fish, which are golden versions of fish that sell for 100x the Sand value of a normal fish. Sand can also be exchanged into HoloCoins at a 1 : 1 ratio.
Sand, which is the currency used to buy fishing rods. More advanced rods are able to catch more varieties of fish, and have a higher chance of catching valuable "Shiny" fish, which are golden versions of fish that sell for 100x the Sand value of a normal fish. Sand can also be exchanged into HoloCoins at a 1 : 1 ratio.
When the fishing minigame starts, an exclamation mark will appear above the player's head, signaling that a fish has been hooked. The appearance of the exclamation mark will indicate the type and difficulty of the catch:
- A yellow exclamation mark ( ! ) indicates an easy catch, with a handful of slow moving keys, usually for a common fish of low amount.
- An orange exclamation mark ( ! ) indicates slightly faster moving keys, with a greater number of successful inputs required to catch the fish, which will usually be rarer or of higher amount.
- A single red exclamation mark ( ! ) indicates significantly faster and more numerous keys, signalling a much rarer catch.
- Three red exclamation marks ( !!! ) mean that a shiny fish has been hooked; these will pose the hardest challenge in terms of speed and number of keys.
Catching fish in succession will build up a combo chain that increases the chance of rarer (and consequently, more difficult) catches. The Bonus Fish (number of extra fish) and Speed Lv (speed of keys) both increase by 1 for every 10 chain the player has. While Speed Lv caps out at 7 at 70 chain, Bonus Fish increases indefinitely with the player's chain.
The following will cause the combo to reset:
- Failing to catch the fish.
- Switching fishing rods.
- Leaving the Holo House mode or closing the game.
There is a short cooldown after each key press and each key missed (indicated by the buttons blinking briefly), in order to prevent the player from spamming the buttons.[2]
When using a non-golden rod, the odds of catching a shiny fish begin at 1/701, then rise to 1/21 at a combo chain of 136. When using a Golden Rod, the odds are increased, starting out at 1/561, then rising to 1/21 at a chain of 108.
After catching a Shiny fish, a trophy item of that caught fish will be unlocked in the Construction menu, under the Wall Decoration tab, for no HoloCoin cost. Even if the player sells the Shiny fish to Bloop, the player will still retain the trophy item.
On rare occasions, instead of fish, players may acquire Holo House furniture from fishing, allowing them to get the furniture for free instead of having to spend HoloCoins at the Construction Shop.
List of Fish
| Fish | Minimum required fishing rod | ||
|---|---|---|---|
Shrimp |
50 | 5000 | |
Clownfish |
100 | 10000 | |
Tuna |
150 | 15000 | |
Koi Fish |
200 | 20000 | |
Lobster |
250 | 25000 | |
Eel |
300 | 30000 | |
Pufferfish |
350 | 35000 | |
Manta Ray |
400 | 40000 | |
Turtle |
450 | 45000 | |
Squid |
500 | 50000 | |
Shark |
750 | 75000 | |
Axolotl |
2000 | 200000 |
List of Rods
| Rod | Description | |
|---|---|---|
| 0 | A used half broken old rod. | |
| 5000 | A rod that once belonged to a local Uncle Dad. Able to catch new kinds of fish. | |
| 15000 | A strong metallic rod made by a blacksmith and can be used for many, many, MANY hours straight. Able to catch new kinds of fish. | |
| 50000 | A magic enchanted rod from the lost city of Atlantis. It is said this city is still yet to be fully built. | |
| 250000 | A powerful fishing rod that is said to have been owned by a magical Turkey that was really into fishing. Able to catch the strongest types of fish. | |
| 1000000 | The greatest rod that makes it easier to catch the most special variants of fish. |
Fishing Tips
- If fishing for lesser fish types like Shrimp and Clownfish, it may be better to switch to a less advanced rod like the Beginner's Rod in order to eliminate the chances of acquiring higher level fish, as more advanced rods tend to have higher chances of catching better fish to the detriment of catching lesser ones.
- On the other hand, higher level rods are able to catch lesser fish types at larger quantities to offset their relative rarity. Players should just decide if they want to use a less advanced rod to catch lesser quality fish more often, or wait to catch more fish using a more advanced rod.
Cooking

![]() Below the lake is a large
Below the lake is a large ![]() Cooking Cauldron, where players can cook Meals using ingredients produced from Farming and Fishing. These Meals can be used when starting a run in the main game mode to provide various benefits for a single run. Each meal provides a limited number of uses, with each use being consumed per run regardless of whether the run is cleared or not.
Cooking Cauldron, where players can cook Meals using ingredients produced from Farming and Fishing. These Meals can be used when starting a run in the main game mode to provide various benefits for a single run. Each meal provides a limited number of uses, with each use being consumed per run regardless of whether the run is cleared or not.
Meals are automatically eaten once cooked, and the current active meal will be displayed in the character select screen; cooking another meal will immediately override the previous meal regardless of how many uses the previous meal had remaining. Players can choose not to use the active meal on their run by unchecking the option on the stage select screen.
An "Auto-Cook" feature can be activated to allow the game to automatically cook the last created food item, provided the player has enough of the required ingredients stocked up.
Recipes will unlock as players gain more ingredients in their inventory from fishing and gardening.
List of Recipes
| Recipe | Uses | Food Effect | Ingredients |
|---|---|---|---|
| 5 | Increase ATK by 30%. | ||
| 5 | Increase SPD by 25%. |
| |
| 3 | Increase Crit by 10%. | ||
| 5 | Increase Pick Up Range by 40%. |
| |
| 3 | Increase Haste by 15%. | ||
| 3 | Increase ATK/SPD/PUR by 20% and Max HP/Crit/Haste by 10%. | ||
| 5 | Automatically heal 50% HP if if HP drops below 25% up to 10 times. | ||
| 5 | Increase Max HP by 20. | ||
| 5 | Increase Max HP by 40. |
| |
| 3 | Gain 1 extra life | ||
| 5 | Targets drop 30% more HoloCoins. | ||
| 5 | Burgers drop twice as often. | ||
| 3 | Every 30 seconds, become invincible to all attacks for 5 seconds. | ||
| 5 | When taking damage, increase Special meter. | ||
| 3 | Greatly increases the chance of |
||
| 3 | Take 33% less damage from projectile attacks. | ||
| 3 | Greatly increases the chance of all EXP-related items appearing. |
Recipe Notes
- Using HP-boosting meals like Pufferfish Meal Set, Unagi Don, and Calamari Set will make the player's character start a run with the additional max HP in the red, as the game does not automatically compensate for the temporary additional max HP, requiring players to heal up the missing HP.
- Turtle Soup multiplies the weight of
 Study Glasses and
  Researcher's Coat by 10, causing them show up more often, typically within the first 1 - 5 levels.
 - Similarly, Strange Seafood Soup multiplies the weight of
 Halu by 10.
 - Vegetarian Burger and Fries will have its icon appear on the bottom left of the screen, with a counter showing the remaining number of times the ability can activate during the run.
History
- For full list of changes, see Changelog.
Trivia
- The music for this mode is Yumemiru Sora e by Hololive Idol Project with elements from Connect the World by Hololive English and Id:entity voices by Hololive Indonesia. Yumemiru Sora e, Connect the World and Id:entity voices were originally sang by HoloJP Gen 1, Myth+CouncilRyS and HoloID gen 1+2 respectively.
- The specific segment from Connect the World itself is also a call back to Hololive theme song Shiny Smily Story making the BGM a reference to the theme songs of all three Hololive branches.
- (Version 0.6) To the south of the map, a group of Nousagis can be found working on the site of the future Usada Casino.
- Elfriend and the Nousagis are the second fan mascots to appear in-game before the Holo Member they supposed to represent. They are the fan mascot of Shiranui Flare and Usada Pekora respectively.
- The choice of Elfriend and Nousagi could be a teaser for the next sets of character for Ver. 0.7 which are JP Gen 3 and Gen 4, based on the real-life debut order.[Speculation] Flare and Pekora are part of Hololive Gen 3 HoloFantasy.
- The first mascot to appear before their member is the SSRB of Shishiro Botan. See: Stage 2/Design reference and trivia#SSRB
Design and reference
- Main article: Holo House/Reference and Trivia
Gallery
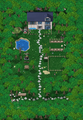
Full view of the Holo House map as of 0.6. Image stitched together from 18 individual screenshots. (Click for larger view)
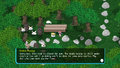
Usada Casino, under construction (south end of the map).
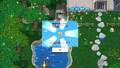
Catching a golden (shiny) fish.
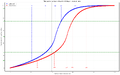
Probabilities of catching a shiny (golden) fish after a certain number of chains when using a golden rod versus other rods. (Credits to /u/ACBorgia)


Sprites
Characters

Bloop

Nemu

Foreman Elfriend

Chief Nousagi Worker

Nousagi Worker

Nousagi Worker (Crying)

Nousagi Worker (Fainted)

Sneaky Tako

Sneaky Tako

Sneaky Tako (found by Ina)
Fish (caught)

Shrimp

Golden Shrimp

Clown-fish

Golden Clown-fish

Tuna

Golden Tuna

Koi Fish

Golden Koi Fish

Lobster

Golden Lobster

Eel

Golden Eel

Pufferfish

Golden Pufferfish

Manta Ray

Golden Manta Ray

Turtle

Golden Turtle

Squid

Golden Squid

Shark

Golden Shark

Axolotl

Golden Axolotl
Plant growth

Wheat

Tomato

Potato

Rice

Onion

Carrot

Green Bean

Pepper

Straw-berry

Corn

Radish

Garlic
Others

Bloop's desk
Soundtrack
References
- ↑ @HoloCureGame on Twitter: "In update 0.6, there will be a new special content where "randomly generated NPCs" will appear with randomly given names. If you'd like to give your usernames to be used in this content, please fill out the form!"
- ↑ /u/kaynimatic on Reddit: "There is a short cooldown after each press. When you fail or miss a press, you will see all buttons "blink" temporarily. That's the period of time you are not allowed to press again. This is done exactly to prevent you from spamming. It would be too easy otherwise. You have to be precise with your timing."
| Gameplay | |||||||||||
|---|---|---|---|---|---|---|---|---|---|---|---|
| Main | |||||||||||
| Mechanics | |||||||||||
| Stage |
| ||||||||||
| Other | |||||||||||